

You want to learn how to play solos on a guitar but you don’t know where to start. You are fairly new to the instrument and you don’t know much about musical theory. The information on the web seems rather overwhelming than helpful.
Does that sound like your case?
Perfect!
I feel happy to tell you that in this guide I will teach you exactly what you need to know to be able to improvise on a guitar. You will find out things that I wish someone had told me back in the days when I just started learning the basics of soloing just as you are starting right now.
Foreword
Before we get to the main part, there are a few things that we need to set straight. You have to understand that just reading this guide won’t make you play like Slash or Angus Young. In fact, no guide in the world can do it. The goal of this article is to help beginners understand the basic concept behind playing a solo over a backing track and what they should do move from knowing nothing to being able to play simple solos at least.
At the same time, all the theory in the world won’t help you if you don’t take action. Learning how to improvise on a guitar is a long marathon, not a sprint. The key here is to enjoy playing the guitar. As long as you are passionate about music and guitar, you will enjoy every single bit of progress you make over time and before you know you will be able to play shreddelicious solos just like your favorite rock star.
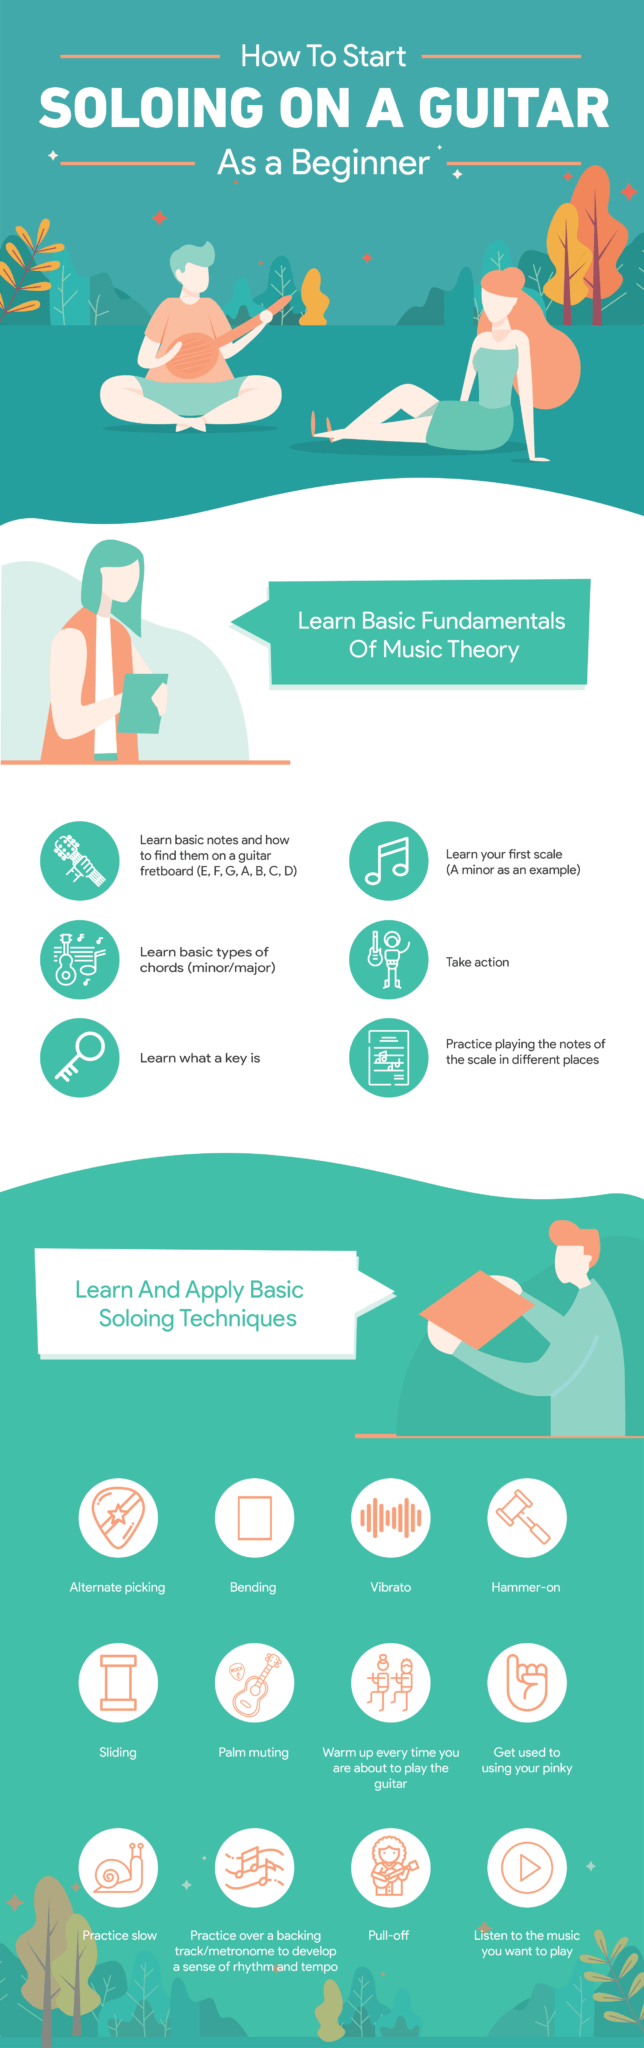
How to Learn to Improvise on Guitar: Visual Infographics
Fundamentals of playing a solo
To put very simply, improvising is playing certain notes over a backing track – a sequence of chords or even one chord. The important thing to understand for beginners that the notes you play must “match” the type of chords playing in the background. So in order to be able to play a solo, you need to know what chord is playing in the background and what notes you are “allowed” to play. In the next sections, you will learn about different types of chords as well as what notes you can use to make your solo nice and tasty.
To make it easy for you to navigate and wrap your head around the possibly overwhelming amount of information to consume, I divided this article into two main sections:
- theory
- practice
In the theory part, you will find out about chords, keys, scales and how it all works together. In the part about practice, you will learn about what types of soloing techniques exist out there and which you can use as a beginner to spice up your solo and make it sound tastier.
Before you move to the further sections, make sure you are familiar with basic notes and how you can find them on the fretboard. If you don’t know that, reading any further might be somewhat confusing.
If you are not familiar with basic notes and how you can find them on a guitar fretboard, check out this short guide:
Alternatively, you can use this small infographic as a reference.
Theory
Chords
To play a solo, you need a backing track that is a sequence of chords. Going deep into different types of chords and chord progressions would be too overwhelming for beginners. This is why in this guide we will only cover the basics. You will learn how to find a good backing track on Youtube.
Nonetheless, there are two things that you need to know about backing tracks for now.
First of all, there are two types of backing tracks:
- minor
- major
Secondly, every backing track has a key. To put it simply, a key corresponds to the first chord in the sequence.
So if you have a chord progression A – G – D it means that you are currently in the key of A. If we were to play this chord sequence on the 6th string, we would play:
- 1st chord: 5th fret (currently A note, root)
- 2nd chord: 3rd fret (currently G note)
- 3rd chord: 10th fret (currently D note)
The same chord sequence moved a whole step up (a whole step corresponds to 2 frets on a guitar) would now be in the key of B.
So, in this case, we would have to move each note 2 frets up. Here is how we would play this same sequence, but in the key of B:
- 1st chord: 7th fret (currently B note, root)
- 2nd chord: 5th fret (currently A note)
- 3rd chord: 12th fret (currently E note)
This is a very basic explanation, but even if you don’t quite understand it – don’t worry. For now, you will simply look up a backing track on Youtube. For example:
- “A minor backing track”
- “G major backing track”
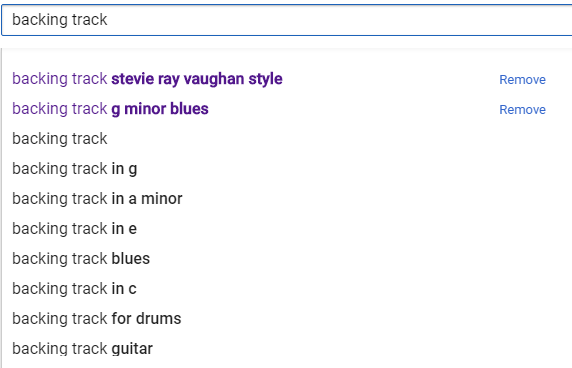
Optionally you can specify the style of music you prefer. For example:
- “G major backing track blues”
- “B minor backing track rock”
There are all sorts of backing tracks out there, so you can specify even more details. You can add preferences like:
- artist
- band
- instrument
- speed

- there are different types of chords, like minor and major
- each chord or song can be played in different keys
- the “backing track” and the solo must be played in the same key
Scales
I could go the easy way and just tell you to google a certain scale and memorize all its shapes.
I learned it that way. It works.
But you know what?
I would have learned the scales much faster if I knew the basic fundamentals behind the concept of scales back then.
I wish someone had explained to me what I’m about to teach you right now.
This is exactly why I don’t want to send you on the common path of learning a scale: blindly memorizing its shapes.
By knowing why scales are the way they are you will be able to learn them much faster and much easier.
Let’s get started.
Basic fundamentals of scales
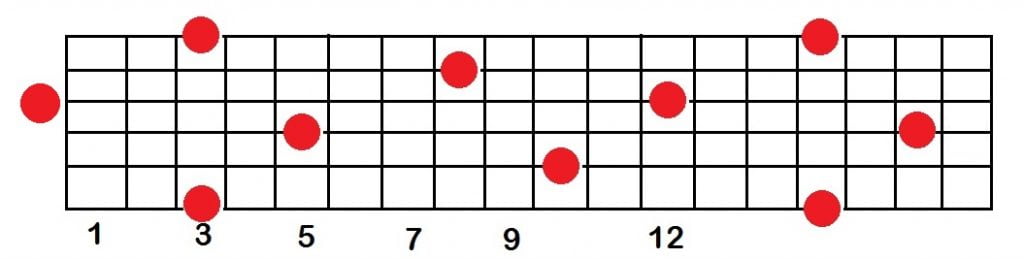
You should know by now that an octave is a distance between two same notes.
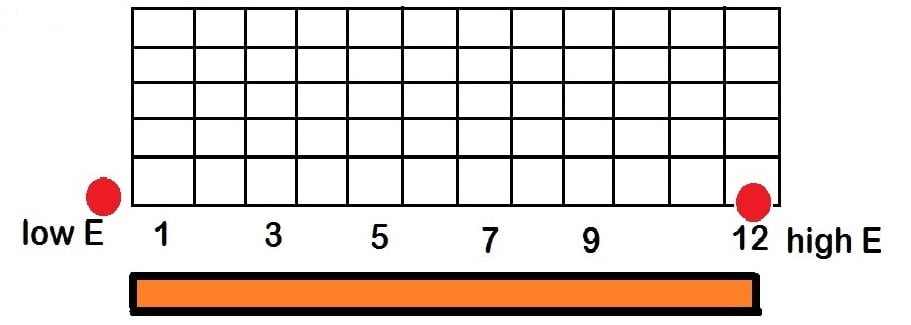
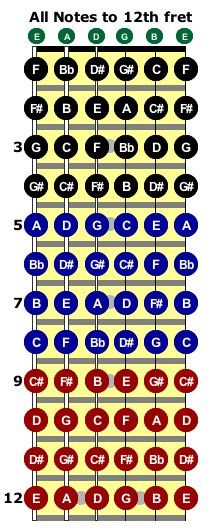
As you can see on the picture, the distance (the orange bar) from the low E note (open 6th string) to high E note (12th fret 6th string) is called an octave.
This distance is divided into 12 chunks that are called semi-tones.
On a guitar fretboard, one semi-tone is represented by a half-step.
The important part is that a semi-tone is the smallest musical interval we, humans, can hear. This is why most musical instruments use the same division into 12 semi-tones.
Technically, we could increase the number of frets on a guitar to 120 instead of 12. That would divide the space between low E and high E to 120 smaller pieces instead of 12 regular semi-tones.
The problem is that human’s ear wouldn’t be able to hear the difference between “tiny” fret 1 and 2 and therefore there is no practical value in creating such an instrument.
So what is a scale?
A scale is simply a sequence of notes within one octave. In a nutshell, we just drop some notes and use whatever is left.
Let’s look at some examples.
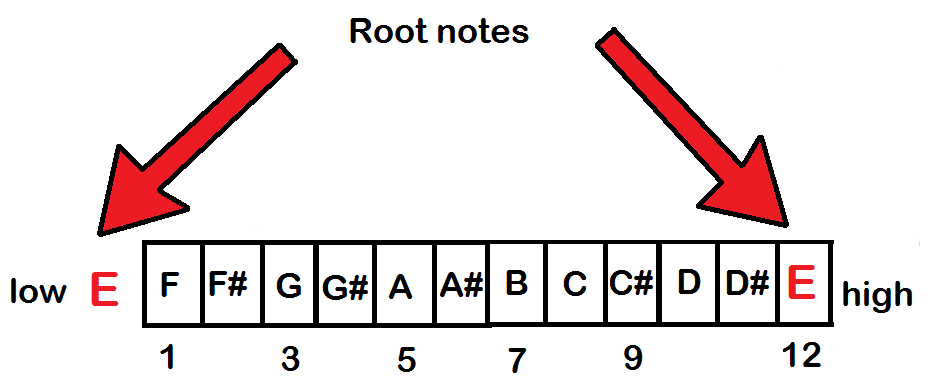
E minor pentatonic scale

- E – because it starts on the note E
- minor – just because (seriously, you don’t want to know the theory behind it, trust me)
- pentatonic – because “penta” means 5 and the scale consists of 5 notes.
The notes of E minor pentatonic scale:
- E – 1st note of the scale (root)
- G – 2nd note of the scale
- A – 3rd note of the scale
- B – 4th note of the scale
- D – 5th note of the scale
E major pentatonic scale

The notes of E major pentatonic scale:
- E – 1st note of the scale (root)
- F# – 2nd note of the scale
- G# – 3rd note of the scale
- B – 4th note of the scale
- C# – 5th note of the scale
E Hirajoshi scale (Japanese style)

The notes of E Hirajoshi scale:
- E – 1st note of the scale (root)
- Gb – 2nd note of the scale
- G – 3rd note of the scale
- B – 4th note of the scale
- C – 5th note of the scale
All the three scales in the examples above have their starting point on the note E, so we say that all these scales are “in the key of E”.
If we were to shift the starting point of a scale to the note A, then our scale would be “in the key of A”.
Keep in mind that the relation (intervals) between the notes we drop and the notes we play remains the same as we change the key. Minor pentatonic (or any other) scale will have the same intervals between notes regardless of which key you choose to play it in.
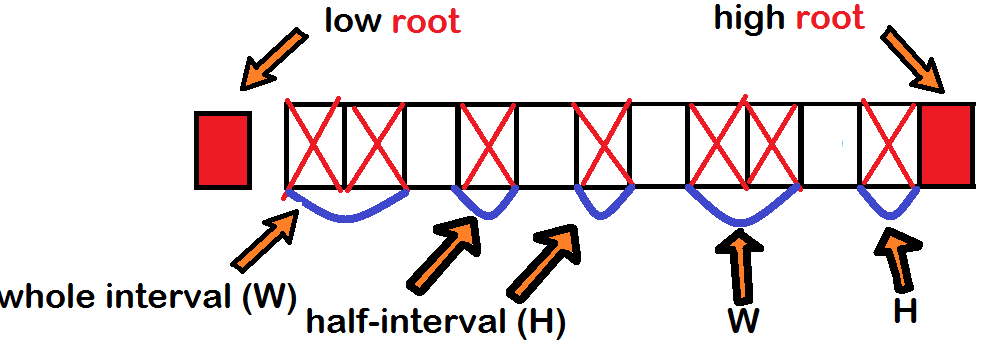
Minor pentatonic scale “formula”
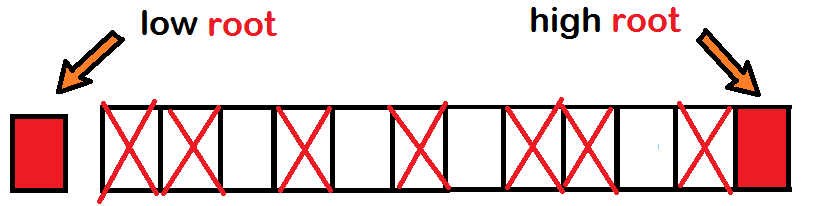
In music theory, a scale is defined by the intervals between its notes rather than the notes themselves.
Intervals are basically those notes that we choose to drop out of the 12 semi-tones.
There are half-intervals (H) and whole intervals (W).
A half-interval is equal to a semi-tone (1 crossed square), a whole interval is equal to 2 semi-tones or 1 tone (two crossed squares).
Using scales to play a solo
The basic idea is to “match” the chords (backing track) and the notes you play (the scale) in two categories:
- key
- minor/major
If you are jamming over B minor backing track – as a beginner you want to play the notes of the B minor scale.
“Matching” the key is pretty obvious. You almost immediately know when you play out of the key because 99% of times it will sound terrible and you don’t need to be a professional musician to hear that.
“Matching” a minor backing track with a minor scale is not that obvious. Advanced guitar players will often seek ways to make their solos sound less ordinary and more interesting. Most of the time experienced players will go outside the boundaries of the standard scale shape by adding notes from other scales. In some cases, they will play a major scale over minor chords to give their solo a different “flavor” or create a contrast between happier major and “darker” minor notes.
While those techniques work great, as a beginner you should stick to fundamentals. First, you need to get comfortable with playing basic stuff, and only then it makes sense for you to expand beyond the boundaries of the scale.
In the next section, you will find out how to actually use scales for improvising on an electric or acoustic guitar.
- a scale is a certain sequence of notes within an octave
- a scale is defined by the intervals between its notes rather than the notes themselves
- you can use the same scale in different keys
Practice: Using Scales for Improvisation
Finding notes on the fretboard
By now you already know that to play a solo over a backing track, you need to find out what kind of chords the track consists of and which notes you are “allowed” to play.
In the previous section, you learned about the structure of a scale. For example, now you know that a minor pentatonic scale is a sequence of W-H-H-W-H intervals (crossed squares).
In different keys, the actual notes of the scale will change, but the relationship between notes always stays the same: W-H-H-W-H.
In the case of an E minor pentatonic scale, the notes will be:
- E – 1st note of the scale (root)
- G – 2nd note of the scale
- A – 3rd note of the scale
- B – 4th note of the scale
- D – 5th note of the scale
Each note on a guitar fretboard can be played in various places.
On the picture below the note G is represented by a red circle.
As you can see, just within one octave the G note occurs 6 times.
The notes of the G minor pentatonic scale are:
- G – 1st note of the scale (root)
- A# – 2nd note of the scale
- C- 3rd note of the scale
- D – 4th note of the scale
- F – 5th note of the scale
If we mark all the occurrences of these 5 notes on the fretboard, we will see how the notes of the G minor pentatonic scale are distributed across the guitar neck.
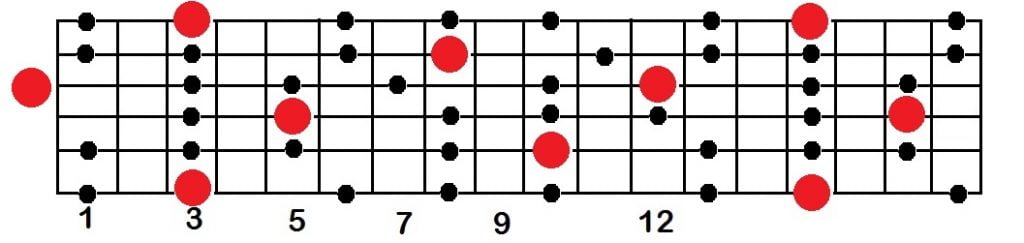
Again, shifting this scale to a different key or changing guitar’s tuning will change the actual notes under the circles, but the overall shape of my heart the boxes will remain the same.
So if want to play a solo over a G minor backing track, you want to use the notes that are represented on the picture above (assuming your guitar is in standard tuning).
The easiest way to remember a scale is to know its root notes.
The root – is most often a starting (and ending) point of your solo. By knowing where the G notes are located on the guitar neck you can easily navigate your way to other notes of the scale.
Remember, the intervals between the notes remain the same.
So anytime you have a root note, you can immediately find the next note of the scale by simply adding 3 frets from your current position (whole interval) and that will be your 2nd note of the scale.
To move further, you add 2 frets (half-interval) and you find your 3rd note of the scale.
From there on you add two more frets (half-interval) and you end up on the 4th note of the scale.
Next, you add 3 more frets (whole interval) – this is your 5th note of the scale.
Lastly, you add 2 more frets (half-interval) and you end up where you started – your root note.
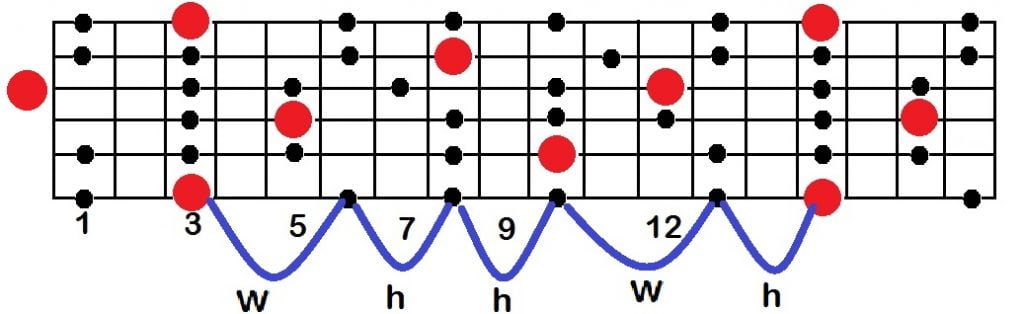
Once you understand this, the rest is all about exploring the fretboard and learning the notes of the scale and ways to move between them in your solos.
- each note on a guitar fretboard can be played in various places
- root note – is the starting (and ending) point of the scale
- you can navigate your way around the scale by using root notes as a reference points
Soloing techniques
As I’ve said at the beginning, just knowing the theory won’t make you play better until you take action and start practicing the scale.
There are many different soloing techniques, but since this article is to help mainly beginners, we will only look at some of the most common and easy to apply techniques that will make your solo sound emotional and soulful.
Alternate picking
Alternate picking is simply altering upstrokes and downstrokes. If you play the first note with a downstroke, then the second one should be played with an upstroke and visa verse.
This concept may sound easy and unimportant, but in fact, this is the most important technique on the list and you should put the most effort into it.
Before we move to the benefits of alternate picking, I suggest you watch a great lesson by one of my favorite youtube teachers Steve Stein.
For a beginner guitar player, playing with alternate picking might seem a bit uncomfortable at the beginning.
But in a long run getting comfortable using alternate picking is equal to graduating to the next level of guitar mastery.
Don’t get me wrong here. Downstrokes are not bad. There are a lot of songs where downstrokes are predominant. For example, James Hetfield, singer and guitarist of Metallica, is famous for his downstrokes. In fact, he is known as the “king of downstrokes”.
So if you play only Metallica songs, you might get away with downstrokes for a while.
But using downstrokes only in a long run will limit you in two factors:
- speed
- efficiency
When you picking a string with a downstroke, you need time to move your hand back to the starting position, which is significantly limiting your speed. By using alternate picking you will be able to develop your speed much faster and easier.
Besides speed, you also need to understand that a lot of licks and riffs are played using alternate picking technique. By “forcing” unnecessary downstrokes in a lick, you will not be able to play the lick up to the original speed, because it will take you additional effort to play every note.
Even if you manage to play it up to speed, the lick will sound different and unnatural in the best case scenario.
But what’s most important, even if you somehow play it up to speed and make it sound okay, it will take you much more effort than if you were playing it the “right” way, using alternate picking.
It might sound like not a big deal, but efficiency is a huge factor when it comes to playing the guitar. Every unnecessary movement, every inefficient hand position and picking pattern will add up and cause tiredness in your hands (both right and left).
So instead of successfully playing a song, your hands will get tired in the middle of it and this may cause sloppiness and inaccuracy in your further playing.
The best way to practice alternate picking is by using a metronome. This way you can practice alternate picking, develop your sense of rhythm and improve your speed at the same time. Be patient and don’t start with a fast tempo that you are not comfortable with.
In order to play fast – first learn how to play slow.
Over time you will be able to play faster, but this doesn’t happen overnight – it’s a gradual process and most often you don’t notice a specific “moment” when you got better. It’s just all of a sudden you realize that you can play a lick or riff at a speed that you couldn’t handle before.
I will repeat again – alternate picking is very important. It develops your sense of rhythm, timing and improves your right-hand picking speed. Practicing alternate picking is the fastest way to improve as a guitar player.
Don’t overlook this opportunity.
Bending
Bending is one of the ways of approaching a note. Instead of picking the note itself, you pick the note below your “target”. Then by bending the string, you continue raising the pitch until you reach the desired note. In a nutshell, it is going from a lower note to a higher note.
You can bend the strings either up or down. Bending both directions create exactly the same effect. For the 1st, 2nd, 3rd and 4th strings I recommend bend up. For the 5th and 6th string, I recommend bending down for obvious reasons.
But that’s not a rule. Often times I bend the 3rd strings both ways depending on the situation and the lick. This also depends on your guitar. It might be different for acoustic and electric guitars so it’s totally up to you.
Try bending each string and see which way feels more comfortable for you.
I couldn’t write a lesson on bending without introducing you to a great guitar lesson by one of my favorite guitar players Steve Vai.
You should know and be able to use at least two types of bends:
- half bend
- full bend
A half bend increases the pitch of the note by a half-step (1 fret). So if you bend the 7th string only half, it will “move” the sound 1 fret (half a step) up and produce the sound of the C note.
A full bend increases the pitch of the note by a whole step (2 frets). If you wanted to play the D note, you could pick the 1st string on the 9th fret or you could pick the 7th fret and make a full bend which would produce the desired D note.
Bending requires you to apply some force to the strings. While technically you can bend with any of your fingers, most often you want to use your ring finger or both ring finger and pinky. This way you create the supporting power with your whole wrist rather than with 1 finger.
The last thing you need to know about bending for now as a beginner is that you don’t really need to “lift” your wrist or fingers to make a bend. Instead, you should “spin” your wrist in a clockwise direction.
Sliding
Sliding is very similar to bending because essentially you achieve the same result – raising the pitch of the note.
Keep in mind that you can slide both forward and backward.
Sliding works best in combination with vibrato, which is the next technique on the list. But before we continue, I recommend watching this awesome guitar lesson by Michael, where he teaches how to use bending and sliding in your guitar solos.
Vibrato
This is a must-have tool in your soloing arsenal. Vibrato makes your solo sound alive and emotional.
One of the ways to make a vibrato is to rapidly bend the string up and down, causing the note to go slightly below and above its pitch.
They say a picture is worth a thousand words. In this case, a video is worth a million words. Especially a video guitar lesson by the master of vibrato and one of the greatest guitar players of all times Steve Vai.
Hammer on
This is a very common and easy-to-learn technique. As you can see on the video, you only need to pick a note with your index finger and then quickly “hammer on” your target note with your ring finger or pinky.
This is very similar to what you do with bending and sliding. Instead of performing a slide or a band from a lower note to your target note, you instantly hammer the desired note, which results in a bit different sounding.
Pull off
Pull-off is a technique guitar players use on a fretted string that is already ringing – by lightly “pulling” the string while removing the finger holding down a note, a new note can be played without re-picking the string. In a nutshell, it is the opposite of hammer on.
Pull-offs and hammer-ons are very similar techniques and are very often used in a combination.
Here is a great guitar lesson on these two techniques from another awesome youtube teacher Marty Schwartz.
Palm Muting
Palm muting is a technique of muting the undesired strings with the palm of your picking hand. Instead of explaining it I suggest watching an awesome guitar lesson by Carl Brown.
- alternate picking is the most important technique to learn for beginners
- using other soloing techniques will make your solo sound more soulful and tasteful
General soloing tips
Warm-up
Warm up is VERY important. And I mean VERY. All professional guitarists perform a warm-up before their performances. There is a very big difference between the same player who has warmed up and who hasn’t.
Sometimes after playing guitar for a couple of hours, you will notice that you can easily play songs or licks that you couldn’t before.
But you wake up the next day, try playing the same song you played yesterday and guess what – you can’t do it anymore.
Why?
That is because your hands and fingers are capable of playing much faster and much more precisely when you are warmed up.
Conclusion: always perform at least a short warm up. You can run scale shapes or just come up with your own repetitive lick that you can loop over and over again.
Get Used to Using Your Pinky
For many beginners using a pinky to play licks can be difficult and that’s normal. What’s important is that you have to start “training” your pinky, because most of the songs, riffs, licks and scales are very hard to play without using your pinky.
I can’t stress enough how important it is to have a functional pinky for playing solos or really anything else on guitar.
Make pauses
Just because you know a lot of cool licks and can play many notes, it doesn’t mean you should do it non-stop.
This is something a lot of guitar players tend to forget. They will stuff their solos with as many notes as they can completely forgetting that it’s not about showing off how cool you are but to playing good music that your listeners will enjoy. At least that’s the kind of goal you should have.
Playing solos is similar to speaking. Instead of doing “bla bla bla” non-stop you should give it a break once in a while. Sometimes a pause is as important as the solo itself.
Fretting hand position
The position of your fretting hand as well as the way you hold your pick will naturally change as you play different types of licks and riffs. That’s something you should get comfortable with and the sooner you do it the better.
I highly suggest watching this great guitar lesson by Claus Levin two ways of positioning your hand.
Practice over a backing track
Whenever you decide to practice a scale or lick, you should always do it over a backing track and there are two reasons for that.
First of all, backing tracks come with drums that basically work as a metronome and help you practice your sense of rhythm and timing.
Secondly, the same note or lick will sound a bit different when played over different chords. By playing over a backing track you will be able to hear how the same lick can have many different soundings.
Additionally, it’s much easier to play a creative solo or lick when you have a nice backing track playing in the background.
Listen to the music you play
If you want to be able to be able to improvise at a guitar, you absolutely must listen to the music you want to play. There is just no way around it.
Without listening to blues you will never be able to play it no matter how many scales and licks you learn.
It is very important to get that sound in your ears because eventually, you will memorize typical patterns and licks that are used in blues.
Over time, as you become better, you will be able to create that “bluesy” sounding in your solos.
- warm up each time before playing the guitar
- practice using your pinky
- practice over a backing track/metronome
- listen to the music you want to play
Recommended for reading: